How to Master the Mexican Handstand: A Guide to Backbends
Unlock the secrets to a deep, safe, and impressive Mexican Handstand. It's not just flexibility, it's control.
TABLE OF CONTENTS
1. The Code of the Mexican Handstand
1.1. Respect the Spine: Your Non-Negotiable Foundation
The Mexican Handstand is an advanced, gravity-defying shape that never fails to impress. It’s a full-body statement—a handstand where you bend backwards, opening your entire posterior Kinetic Chain, from the shoulders down to the hips. But let's get one thing straight before we even begin: this skill demands respect. If you’re here, you’re eager to get upside down and carve out a deep, impressive backbend. I get it. I’m all for maxing out your potential, but I’m even more for staying healthy while you do it. Your back supports your entire body. Under no circumstances do you ever mess with your spine's health. No new move, no workout, is worth a night you can't lay straight. So when you train for the Mexican Handstand, you will act accordingly. You will go slow. You will make small, steady progress. And most importantly: you will stay consistent.
1.2. The Body's Deceptive Signal
A physical therapist at Cirque du Soleil once explained the back to me like this: when you cut your arm, the pain signal is immediate. Your back, however, is a different beast. It’s designed for survival. It can hold a pain signal back to ensure you can function in an extreme situation. The problem for us athletes? You might feel amazing during a session, more flexible and stronger than usual, and decide to push for twice the depth and twice the reps. In that moment, you feel like a champion. But tomorrow, or two days later, the bill comes due, and you'll feel absolutely terrible. Whether this is folk tale or fact, it’s a powerful story that teaches a critical lesson in training responsibly. You must have a precise plan and stick to it. Always put health before results.
2. The Kinetic Chain Secret
2.1. Unlocking the Entire Chain
Here's the secret to a deep, sustainable, and beautiful Mexican Handstand: you must learn to open every single link in the posterior chain. For most athletes, one part of the body is naturally more flexible—for me, it’s the lower back. It’s tempting to exploit this natural gift, bending primarily through that one spot. This strategy has two massive flaws. First, it puts that single area under immense, repeated stress, creating a direct path to injury. Second, it limits your ultimate potential. A chain is only as strong as its weakest link, and a backbend is only as deep and elegant as its most restricted segment. Learning to open everything—shoulders, thoracic spine, lumbar spine, and hip flexors—is non-negotiable. You have to learn to purposefully open every single part of the back chain to its fullest potential to create a balanced, powerful arch.
2.2. The Hip Flexor Advantage
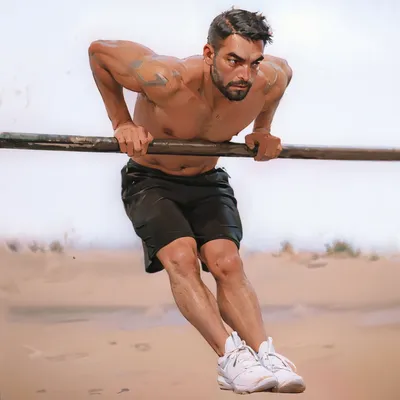
I’m going to talk about every body part in the next section, but I have to highlight this here: your hip flexors are the unsung heroes of the Mexican Handstand. They can contribute a huge amount to your backbend when trained correctly. Picture an athlete on the floor in a perfect Front Split with their arms overhead. Even with a perfectly straight back, there’s already a massive angle of opening at the hip. Now, turn that image upside down and bring both legs back. You have a Mexican Handstand with a straight back and open shoulders, yet the legs are already parallel to the floor. Why is this a cheat code? Because your hip flexors are far less likely to get injured from overuse than your spine or shoulders. They are the joint doing the least amount of support work, so use them to your advantage. Train them relentlessly.
3. Forging Your Backbend: The Drills
3.1. The Mandatory Warm-Up
A proper training session for the Mexican Handstand is long, exhausting, and feels incredible. If you do it right, you will love-hate every second. Start with two sessions per week for the first month, then slowly progress to three or four if you’re serious. But listen to your body. If you feel more sore than usual, take extra rest. This part goes without saying, but you must start with a proper warm-up. Get your body moving with low-impact cardiovascular work, then move to specifics. We’re working the back, so warm up the back. Superman holds and Arch Body Lifts are a perfect choice to activate the posterior chain.
3.2. Isolate the Shoulders
When you stretch your shoulders, you must isolate them. Look at your hands, lock your elbows, and keep your core engaged to prevent your back from arching and stealing the stretch. The goal is pure Shoulder Flexion. If your shoulders are already quite open, your focus shifts to strength. The Mexican Handstand places a tremendous load on the shoulder girdle; it must be resilient. Incorporate drills like Wall Handstand shrugs and controlled negatives to build that strength.
3.3. Mobilize the Upper & Mid-Back
There are countless ways to stretch your back, from the Cat-Cow to the Bridge. The key is to start with isolation exercises that target the thoracic spine specifically, rather than jumping straight into a full Bridge which also demands open shoulders and hips. Drills like kneeling thoracic openers or using a foam roller can help you target this often-stiff area. Active control is paramount. Don’t just fall into a stretch; pull yourself into it.
3.4. Target the Lower Back
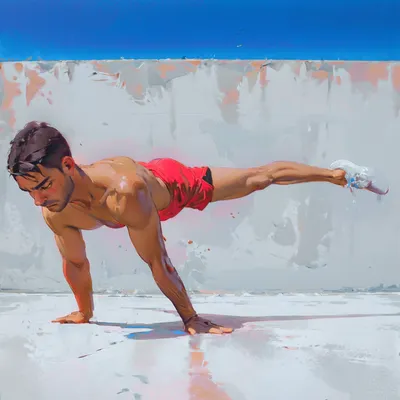
This area is often naturally flexible for many, which makes it a high-risk zone for overuse. You can isolate the lower back by engaging your core to keep the upper back stable. The Cobra Pose is my go-to for this. Focus on pulling your head back to create an even curve through the entire spine, keeping your hip bones glued to the floor. Push your shoulders down and away from your ears, using your back muscles to lift, not just your arms to push.
3.5. Unlock the Hips
This is the true secret weapon. Your hip flexors have so much potential to open up, and they are significantly more robust than your spine. Use them. Whenever you’re stretching your hip flexors, you must engage your abs and pull your hips into a Posterior Pelvic Tilt. A stretch like the Half Split Back Knee Bent is incredible for opening the hips, but it becomes useless if you allow your lower back to arch. Keep the pelvis tucked to ensure the stretch targets the intended muscles. This discipline will pay massive dividends.
4. Building the Skill: From Feet to Hands
4.1. Standing Rehearsal: Wall & Table Taps
Enough prep. It's time to get going, right? Almost. Before we go upside down, we start on our feet. While we can’t replicate the balance or shoulder pressure, everything else is remarkably similar. By practicing upright, you develop the core strength and body awareness needed to support the movement. The most important lesson here is learning to leave the head behind and pull the hands up last. You’ll probably do this wrong a few times, and that’s a valuable lesson. The more mistakes you make on your feet, the fewer you’ll make on your hands. Start facing away from a wall, hands overhead with locked elbows. Lean back and tap the wall. Do not bend your knees. Start close and slowly increase the distance. Aim for 3 sets of 4 slow, controlled reps. Once you're far enough away that you need to lean significantly to tap, replace the wall with a box or high table. Quality over quantity, always.
4.2. Inverted Application: Controlled Taps
Finally, it's time to get upside down and work the real thing. Kick up to a Wall Handstand, facing the wall. For now, the goal isn't depth; it's control. Open back just a tiny bit, tap the wall, and pull back up to a perfectly straight handstand. Nail the straight line in every single rep. Go slow. Film yourself. To truly test your control, lower into a Tuck Handstand between reps. Once you own this, move further from the wall and eventually use the tabletop. Training this way offers two huge advantages: you can't see the target, forcing you to move slowly and with absolute control, and the wall or table prevents you from dropping into a deep, uncontrolled Bridge, allowing you to train closer to your limit safely. You are building strength and awareness, not just flopping into your end range.
5. The Unbreakable Cooldown
5.1. Re-Engage and Solidify
I cannot stress this enough: never, ever, ever skip your cool-down. After any intense backbending session, your back is loose and vulnerable. Before you walk out the door, you must pull it back together and prime it for the demands of daily life. We have to strengthen the back in a closed, flexed position. Start with some gentle Arch Body Lifts again, then move to slow, Rounded Crunches and Hollow Body Holds. The goal is to make the back strong in all directions, so it can bear a greater load and, more importantly, so you feel solid and confident after your workout.
6. Owning the Position: Balance & Longevity
6.1. The Unique Balance Challenge
In a standard Handstand, your weight is biased towards the fingertips for control. The Mexican Handstand is unique. As you lower down, your shoulders push forward, and your center of mass shifts from the fingertips toward the heel of the hand. This dramatically reduces your control and forces you to balance with your entire body. The real challenge, however, is getting back to a straight line. Realigning everything and shifting the weight back to your fingertips is a skill in itself and will require dedicated practice. Furthermore, after stretching, your shoulders and back are opened up, making it significantly harder to find that tight, stable straight-handstand position. This is why you rarely see contortionists perform crisp, straight handstands in their acts. Combining deep backbends with straight-line control is the mark of a true master.
6.2. The Art of Sustainable Performance
Every choreographer I've ever worked with has, at some point, asked for “that back-bendy thingy.” It’s a crowd-pleaser. There was a time I was performing up to 15 shows a week, and every single one demanded a Mexican Handstand. The only reason I survived was because I understood how to control every segment of my back. On days when one part felt sore or fatigued, I could consciously keep it more engaged and protected, while asking another part to open up more. Yes, my bend might not have been at its absolute maximum potential, but I could perform it 15 times a week without breaking. That is the true goal: not just achieving a skill, but owning it with the intelligence and control to perform it sustainably for years. The Mexican Handstand is a beautiful, challenging project that will elevate your entire training practice. Warm up well, cool down even better, and chase slow, consistent gains.
Get to work.