How to Master the Stalder Press to Handstand: A Brutal Guide
The Stalder Press is not a dream. It's a project. Here's the blueprint to build yours. Let's work.
Stalder Mania Online Program - Take the guess work out of your training
TABLE OF CONTENTS
1. Deconstructing the Stalder Press
1.1. What is the Stalder Press?
The Stalder Press to Handstand is not just another skill. It's a statement. It sits at the apex of bodyweight training, a brutal and beautiful fusion of raw Straight Arm Strength, deep Active Flexibility, and pinpoint precision. It is an advanced straight-arm Press to Handstand that begins not from the floor, but from the Stalder position itself, making the journey to the Handstand longer, more aesthetic, and profoundly more difficult.
Let’s be clear: the Stalder Press is a destination goal. While it builds incredible strength, Core Stability, and Proprioception, it is not the most efficient tool for those jobs. You don't learn the Stalder to get better at something else; you forge the other attributes to conquer the Stalder. It is a testament to an athlete’s dedication—a source of immense motivation that demands the development of elite-level flexibility, full-body coordination, and unwavering Hand Balance. The road is long and requires unshakeable patience, but for those willing to walk it, the reward is absolute mastery.
1.2. The Stalder: More Than a Starting Position
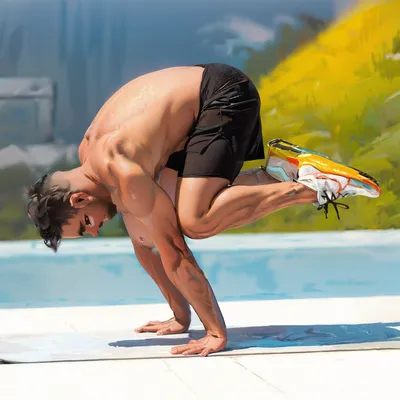
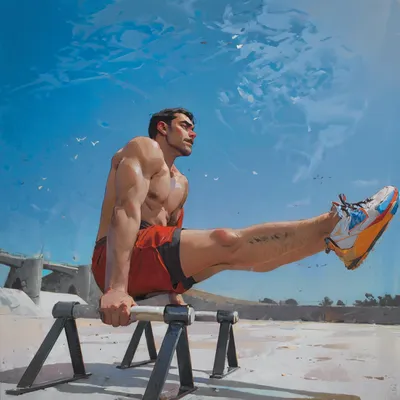
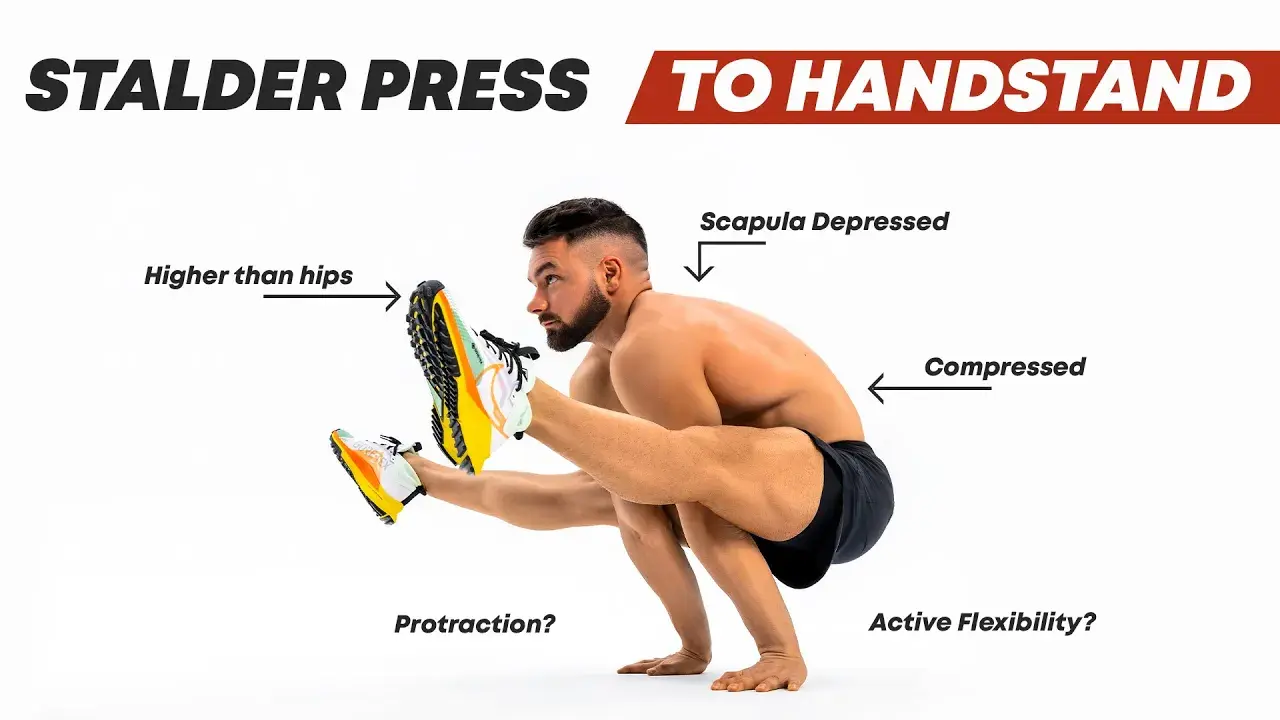
The initial Stalder hold is the foundation upon which your entire press is built. You begin in an upper support position, legs straddled outside your arms. Crucially, your legs are not resting on your arms; they are held aloft by the sheer power of your hip flexors and core. In a perfect Stalder, your feet are higher than your hips, and your quads hover above your elbows. This isn't just for show—a higher Stalder creates a more advantageous starting position, making the subsequent press significantly easier.
The non-negotiables? Locked elbows and locked knees. This is a display of Straight Arm Strength, and full-body tension is paramount. To maximize height, you must actively depress the scapula, pushing your shoulders down and creating a long, powerful neck. Think of it as pushing the floor away. See the Stalder not as a static pose to be checked off a list, but as a living skill you will refine indefinitely. Your first successful press will likely come long before your Stalder is perfect. Embrace the process.
1.3. The Press: The Bridge to Your Handstand
The press is the crucial link between the Stalder and the Handstand. This is where most attempts fail. The objective is to elevate the hips directly overhead while simultaneously opening the shoulders into flexion, all before the legs begin their journey around into the final straddle. This is where patience is forged in fire. Rush the movement, open your hips too soon, or neglect your form, and the press becomes impossibly heavy. You will fail.
The secret lies in leveraging your mechanics. Deeper Flexibility makes the movement more efficient. Maintaining locked knees and elbows is not a suggestion; it's a requirement. The press is a slow, controlled grind that demands absolute faith in your preparation. Panic is the enemy. Trust your strength, trust your technique, and you will rise.
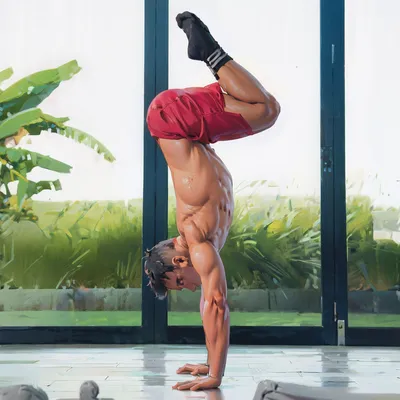
1.4. The Handstand: The Pinnacle of Control
A successful Stalder Press culminates in a rock-solid Handstand. This isn't a sloppy arrival; it's a declaration of control. The final position demands full Scapular Elevation, locked elbows and knees, with your feet, hips, and shoulders stacked perfectly over the center of your hands. Don't disrespect the finish line. Hold the Handstand for a few seconds to validate the rep, especially if you're training for multiple repetitions. It solidifies the Movement Pattern and proves you didn't just get lucky—you earned it.
2. Mastering the Three-Part Technique
Like its floor-based cousin, the Straddle Press to Handstand, the Stalder Press is a symphony in three parts. Your ability to isolate and master each part individually will determine the efficiency and success of the whole. Study these phases. Understand their purpose. Internalize what happens when the lines between them blur. Only then do you stand a fighting chance.
2.1. Phase 1: The Takeoff
The takeoff is the explosive moment you lift from a seated position into the Stalder. It demands a violent combination of Scapular Depression, powerful hip flexor strength, and extreme Compression. Your hamstring Flexibility is critical here, allowing you to fold your body in half. The higher and tighter you can make this initial lift, the easier the rest of the movement becomes. Many athletes will bypass the dynamic takeoff, especially at first, by extending one leg at a time or by lowering into the Stalder from a Handstand. In fact, lowering into the position often creates the highest quality Stalder, with maximum compression and leg height, setting you up perfectly for the press.
2.2. Phase 2: The Compression Period
This is the heart of the battle. During the compression period, your shoulders open and your hips travel upwards. The singular goal is to stack your hips over your shoulders and hands, ideally finishing with a slight Anterior Pelvic Tilt. Throughout this entire phase, your feet must maintain their distance from each other, and you must hold—or even deepen—the Compression you established in the takeoff. More flexibility means better mechanics. A deeper fold shortens the lever, reducing the demand on your shoulders.
The difference between a good press and a great one is revealed at the top of this phase. In a great press, your hips are vertically aligned over your hands, your shoulders are slightly forward, and your back is still rounded. The more you compress, the less you have to lean and the less your press resembles a struggling Planche. But this requires patience. As the press gets harder, the instinct is to panic, arch the back, and try to muscle it up. This is a fatal error. Stay round. Stay patient. Trust your form. If you've done the work, you will make it.
2.3. Phase 3: The Unrolling
If you executed the compression period correctly, the unrolling is your victory lap. With your hands, shoulders, and hips already aligned, all that remains is to sweep your legs in a wide, controlled circle and close them into a perfect Handstand. In an ideal world, only your legs move. In reality, you'll likely still need to open your shoulders a fraction more to complete the line. But the hard work is done. This final, elegant movement is the reward for the brutal grind that preceded it. Own it.
3. Forging the Essential Attributes
The Stalder Press is arguably more demanding than a One Arm Handstand or a full Planche. It's a cruel master, requiring not just one elite quality, but a synthesis of three: flexibility, strength, and technique. They are inextricably linked. Your press will only ever be as strong as its weakest link. You can't hide a deficiency here; the skill will expose it.
3.1. The Non-Negotiable Role of Flexibility
To make your press efficient, you must be flexible. It's not a suggestion. Before you can build strength in the specific angles of the Stalder, you must first be able to achieve those positions passively. This doesn't mean you should wait until you're a contortionist to begin. It means you must dedicate significant, focused time to flexibility training from day one.
Your primary targets are your hamstring and adductor Flexibility, which directly impact your Compression, your straddle, and your pancake. Working on back Mobility to achieve a clean Anterior Pelvic Tilt at the end of the compression phase is also highly advantageous. If you are not yet exceptionally flexible, commit to a minimum of two, ideally three, dedicated flexibility sessions of 45-90 minutes per week. It will feel like a grind at first, but the payoff for your Stalder Press—and every other aspect of your training—is immeasurable.
3.2. Building Brutal Straight-Arm and Core Strength
Unlike a standard Press to Handstand where extreme flexibility can allow you to almost "fall" up, the Stalder Press offers no such shortcuts. You must be brutally strong through every millimeter of the movement. Your shoulders need to handle Scapular Depression, Scapular Protraction, and eventually Scapular Elevation, all while pushing through 180 degrees of flexion. Yes, it's a lot.
This must be paired with a core of steel and powerful hip flexors to create and maintain Compression as your hips rise against gravity. This is where Active Flexibility comes into play, but remember: your active range will never surpass your passive range. Finally, you need strong triceps to maintain locked elbows. Fortunately, triceps strength is often a byproduct of proper shoulder conditioning, so drills like the Tuck Planche and Handstand Push Up progressions will build it automatically. Your focus must be on the shoulders and core.
3.3. Technique: The Synthesis of Strength and Mobility
Technique is the art of applying your strength and flexibility with maximal mechanical advantage. It’s the Mind-Muscle Connection that allows you to engage the right muscles at the right time, turning the impossible into the achievable. Developing this level of coordination takes time and reps. To work on technique effectively, you need a surplus of strength. This creates a seeming paradox: you need to be stronger than the skill requires to learn the technique that will eventually make the skill require less strength.
Here’s how it works: extra strength allows you to perform multiple reps of a drill, spending time in key positions to build awareness and fine-tune alignment. It allows you to survive imperfect attempts. For example, your first Stalder to standing might be a wobbly, miraculous effort. But you keep training. Your position improves, you learn to round your back more effectively, your technique sharpens. Suddenly, the drill feels almost effortless. You have improved your technique and now need less strength, freeing up that capacity for the next, harder progression. This is the cycle of mastery.
4. The Path to Mastery: Progressions and Programming
One of the fastest ways to kill progress and motivation is a lack of clear progressions. You cannot burn out if you are always winning. The key is to break down an audacious goal like the Stalder Press into a series of small, achievable victories. Celebrate every tiny gain. Keep the fire lit. This is how you build unstoppable momentum.
4.1. The Blueprint: A Step-by-Step Progression Model
Many believe you need a perfect Press to Handstand before even thinking about the Stalder. I disagree. It is not only possible but often recommendable to work towards the Stalder Press in parallel. You can start this journey even before you have a consistent freestanding Handstand.
- Level 1: Your first milestones are the standard Press to Handstand (focusing on separating the parts) and a bent-knee Stalder hold. For the Stalder, just focus on depressing your scapula and creating a long neck. Survive the position.
- Level 2: Time to straighten the knees. Work towards holding a straight-leg Stalder, pulling your hips high and feet higher. Concurrently, you should be able to lower from a Handstand until your feet almost touch the floor and press back up with clean form—no arching, no excessive shoulder lean. You should also be able to lower from standing into a bent-knee Stalder.
- Level 3: This is a huge step. The goal is to transition from the Stalder position to a standing position. Start with bent knees and progress to locked knees. The key is a rounded back and maintained Compression. If you open your hips or arch your back, you fail. This is not easy. When you achieve this, be proud. You've accomplished something significant.
- Level 4: Your first Stalder Press. It will not be pretty. It might involve momentum or bent knees. But it will be glorious. This is the moment you have been grinding for. Very few people ever make it here. You have come an incredible distance.
- Level 5: Perfection and reps. One press is impressive. Three, four, or five in a row demonstrates true mastery. Now is the time to polish. Refine your form, deepen your Compression, and perfect your technique. This is the final stage of ownership.
4.2. Structuring Your Training: The Split vs. Dedicated Approach
Chasing a skill this complex requires a plan. You must analyze your weaknesses, map out your progressions, and decide how to integrate it all into your weekly routine. There are two primary approaches: dedicated sessions or a split routine. A mix of both can also be effective, perhaps starting with a split system to build a foundation and moving to dedicated sessions for the final push.
No training split is perfect forever. Find one that suits your goals and schedule, and stick to it. As long as you are making progress, the plan is working. Your choice will depend on your level, available time, other goals, and recovery capacity. Health must always come first. An injury will halt all progress. Keep your training balanced; continue to train your pulling muscles and your legs.
- Dedicated Stalder Session: This approach is for athletes with the time, energy, and focus for long, intense workouts. Perform these sessions 2-3 times per week, maximum. They are brutal and require adequate recovery. A session should include a warm-up, flexibility work, handstand/press technique, and finish with specific strength conditioning.
- Split Routine: If you prefer shorter, more frequent workouts or want to train other skills like the Planche concurrently, a split routine is ideal. Programming is more individual here. A proven split is:
- Flexibility & Compression (2-3x/week): A 60-90 minute session focused on hamstring/adductor stretching, followed by Compression strength work. No handbalancing here, allowing wrists and shoulders to recover.
- Handstand & Strength (2-3x/week): A handstand-focused session. Start with Handstand control, move to the unrolling part of the press, then main press training, and finish with shoulder conditioning (Planche work, stalder lift-offs, Handstand Push Ups).
5. From Dream to Reality: Owning Your Stalder Press
The journey to the Stalder Press to Handstand is a microcosm of the entire calisthenics discipline. It will test your patience, expose your weaknesses, and demand a level of dedication that few are willing to commit. But the path itself forges a superior athlete. Even if you never achieve the final skill, the focused training in flexibility, strength, and technique will elevate every other aspect of your physical practice.
Remember the two most critical takeaways: first, master the three distinct phases of the press, especially the patient, compressed hip lift. Second, relentlessly attack your weakest link, whether it's hamstring flexibility or straight-arm pressing power. The journey will never be easy, but when you pair technical understanding with a smart training approach and unwavering patience, success is not a matter of if, but when.
Get to work.