The Ultimate Handstand Push Up Routine (A Step-by-Step Guide)
Stop pressing and start training. Your HSPU has stalled for a reason. Here's the blueprint to fix it.
TABLE OF CONTENTS
1. The Three Pillars of HSPU Mastery
1.1. Deconstructing the Movement
Forget everything you think you know about the Handstand Push Up (HSPU). It isn't just a shoulder press upside down. While it undeniably hammers your anterior deltoids and triceps, reducing it to a simple vertical press is the fastest way to hit a wall. The moment you invert your body, you introduce a new, non-negotiable element: balance. This single detail transforms the exercise from a brute strength movement into a complex skill. To conquer it, we don't just apply Progressive Overload like we would with a barbell; we must simultaneously master Hand Balance, forge unshakeable Core Stability, and even develop functional Flexibility. Your body doesn't just move down and up—it must fight for every inch of control. This is where true strength is built. We will structure our attack around three distinct pillars: raw skill work, compound strength, and targeted isolation.
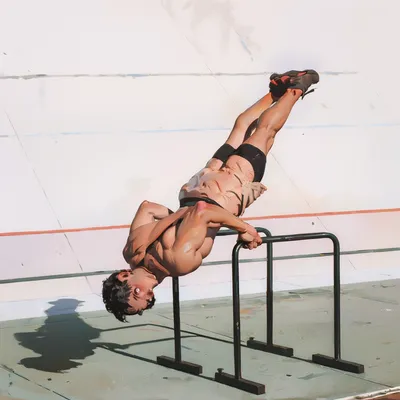
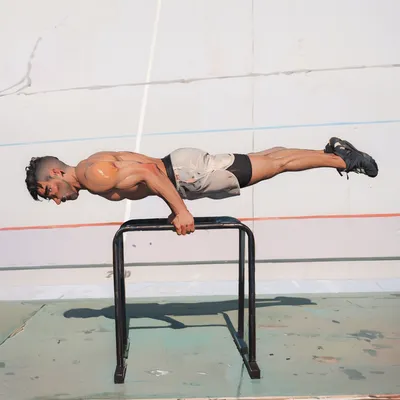
1.2. Pillar 1: Handstand Control First
This is a non-negotiable rule: You never train Hand Balance on fatigued muscles. Your handstand work always comes first, right after your warm-up and Injury Prevention drills. Forget fancy leg shapes, tucks, or straddles for now. Your singular mission here is to build unshakable confidence and control in a straight Handstand. Crucially, you must also master the handstand with slightly closed shoulders—a position you will inevitably pass through during the freestanding HSPU. You need the raw strength to catch and correct this position, but also the refined Proprioception to avoid overcorrecting and flying out the other side. This isn't about becoming a circus performer; it's about building the control to own the space you're moving through.
1.3. Pillar 2: The Compound Lifts
Once the skill work is done, we attack the main lift. Just like in traditional strength training, your heaviest compound movement comes first, when you are fresh and powerful. In our world, this is the HSPU progression itself. We start with the hardest variation you can manage with perfect form. Understand this: from the moment you begin this phase, your power will start to drain. This is by design. We are here to push our limits and trigger adaptation. Every rep is a battle against gravity and fatigue. This is where you forge the primary strength that will drive you towards the full, unassisted Handstand Push Up.
1.4. Pillar 3: Targeted Isolation Work
Training to failure reveals your weaknesses with brutal honesty. This is where you turn those weak points into strengths. After your compound work, you will shift focus to isolation exercises. This is surgical work. We target the individual muscles that support the HSPU: the anterior deltoids, the triceps, the upper chest, and the muscles responsible for Scapular Elevation. Building these smaller, stabilizing muscles in isolation is your insurance policy. When your form falters mid-rep, when you lose balance for a split second, these are the muscles that fire to pull you back from the brink and prevent injury. They are essential for building both resilience and raw power.
2. Programming Your HSPU Sessions
2.1. Bodyweight vs. The Barbell: A Question of Specificity
Should you use weights or stick to bodyweight? The answer is clear, and it hinges on the principle of Specificity. To master a skill, you must train the skill. A thousand barbell shoulder presses will build big delts, but they won't teach you how to balance and press your own bodyweight upside down. Calisthenics strength is incredibly specific. For the main, compound part of your workout, you must work with your body. You are not just building muscle; you are programming a complex Movement Pattern.
However, when it comes to the isolation phase, free weights become an invaluable tool. It is far more efficient to isolate the triceps with a dumbbell extension or the deltoids with a controlled raise than with most bodyweight drills. A word of caution: avoid machines. While machines build muscle mass, they operate on a fixed path, completely removing the need for stabilizer engagement. These small muscles are critical for controlling the movement, maintaining balance, and protecting your joints from injury. We train for function and power, not just for show.
2.2. Training Frequency and Volume
The golden rule of recovery is to allow a trained muscle group at least 48 hours of rest before hitting it again. For the HSPU, this means your shoulders, triceps, and chest need a day off. Do not schedule a heavy bench press or Planche training day right before your HSPU session; both are anterior deltoid heavy and will sabotage your performance. A push/pull or upper/lower split makes adhering to the 48-hour rule simple.
Your HSPU sessions don't need to be marathon events. Quality over quantity. For the main HSPU strength work, aim for approximately 3 exercises of 3 sets each. The volume of isolation work that follows is highly individual. If you're a beginner working to build foundational strength, or if you have bodybuilding goals, you might add more isolation exercises. If you're an advanced athlete, your primary HSPU work will be more extensive, and you'll likely require less supplemental work.
3. The Path to the Full HSPU
3.1. Unlocking Progressions
In weightlifting, you add plates to the bar. In calisthenics, we manipulate leverage. The challenge is to find variations of the full HSPU that mimic the movement precisely while decreasing the load. The secret is in the progressions. By elevating your feet—on the floor, a box, or the wall—we systematically transfer more of your body's weight onto your hands. The higher the feet, the harder the exercise.
I break down the road to the HSPU into these key milestones:
- Pike Push Ups
- L-Handstand Push Ups (feet on box)
- Back to Wall HSPU
- Chest to Wall HSPU
- Freestanding Handstand Push Up
3.2. Bridging the Gaps Between Progressions
The strength gap between each of these milestones can feel immense. This is where intelligent training variations come into play. Don't just chase full reps. Master slow negatives with a pause at the bottom. Add weight to a progression you already own. A powerful technique for the L-Handstand Push Up is to perform a hybrid rep: lower down with your feet on the box, touch your knees to the box to deload, then push back up. These methods build strength at every point in the range of motion.
3.3. The Golden Rule: Train Clean
Your ego is your enemy. Never work on a progression where you can barely squeeze out a single, ugly rep. That's not training; it's testing your one-rep max, which is a recipe for joint pain and burnout. Take a step back. Choose an exercise where you can perform at least 3 clean, controlled reps. This is the sweet spot for building real, usable strength. Respect the progression, stay clean, and earn the right to advance.
3.4. Mastering the Freestanding Handstand
Beyond raw pressing power, you need to refine your freestanding Hand Balance. The goal isn't a ten-minute hold, but absolute control, especially with slightly closed shoulders. The king of drills for this is the Wall Slide Away. You start chest-to-wall in a perfect line. With full Scapular Elevation, you lean your shoulders forward, away from the wall. As you lean, your feet slide down. The only joint that should change angle is your shoulder. Do not arch your back or pike at the hips. Eventually, enough weight will be forward that your feet lift off cleanly. You extend into a perfect line, hold, and then return to the wall with absolute control. This drill teaches you to own the very position where most athletes lose their balance.
4. Forge an Unbreakable Machine
4.1. The Importance of Antagonist Work
Specificity is king, but training in a vacuum is a path to injury. Obsessing over a single goal like the HSPU while neglecting the rest of your body will create dangerous imbalances. Your body is a system. To keep it healthy, you must include pulling exercises. If you train 2-3 times a week, perform your pulling work right after your HSPU session. If you train 4-5 times per week, dedicate two of those sessions to building a powerful back with exercises like Pull Ups, rows, and face pulls. A strong back protects the shoulders and ensures your posture remains solid.
4.2. Never Skip Leg Day
We all love to skip leg day. Don't. It's a cliché for a reason. Neglecting your lower body will not only lead to an unbalanced physique but can contribute to lower back pain and instability. Yes, heavier legs make skills like the Planche and Handstand more challenging. So what? We don't run from a challenge. We get stronger. Train your legs. Build a complete, functional, and resilient body from head to toe.
4.3. The Final Rep
As you can see, the path to the Handstand Push Up can be as simple or as complex as you make it. But success always boils down to a few core principles. Respect the 48-hour rule for recovery. Master each progression before you move on, staying with it a little longer than you think you need. And train your entire body to build a balanced, injury-proof machine. The strength you build pursuing this skill will carry over into everything else you do. Now you have the blueprint. The rest is up to you.
Get to work.